Cost center mischarges usually aren’t a “people problem.” It’s a workflow problem. Hourly staff transfer by time, salaried staff allocate by week, and mixing the two creates messy reports fast. In this article, I break down Exempt vs Non-Exempt Cost Center Transfers in plain language and show how CloudApper hrPad keeps transfers clean with simple rules, tight permissions, and a Manager PIN for the exceptions.

Table of Contents
Have you’ve ever looked at a labor report and thought, “Why are these hours sitting in the wrong cost center?” you’re in good company. This is one of those problems that looks small until it hits payroll, finance, and your managers at the same time. And the truth is, Exempt vs Non-Exempt Cost Center Transfers is where most teams accidentally mix two completely different workflows, then wonder why mischarges keep happening.
Before we get into the “rules, permissions, and Manager PIN” part, let’s ground this in what people actually do on-site. In most places, the transfer starts at the device your employees already touch every day.
What “cost center transfer” looks like in real life (not in a policy doc)
On the floor, it usually goes like this. Someone clocks in and starts working. Then the supervisor asks them to jump to another area. Or a maintenance tech gets pulled into a different job. Or a float staff member covers another line for two hours. The work gets done, but the cost center doesn’t always follow.
That’s how mischarges happen. Not because people are trying to be messy. It’s because the process is either too slow, too confusing, or too open.
This is also where Exempt vs Non-Exempt Cost Center Transfers starts to matter. Hourly employees need a transfer that captures the exact timing. Salaried employees need a transfer that captures a clean allocation without guessing.
Why the hourly workflow breaks first (non-exempt)
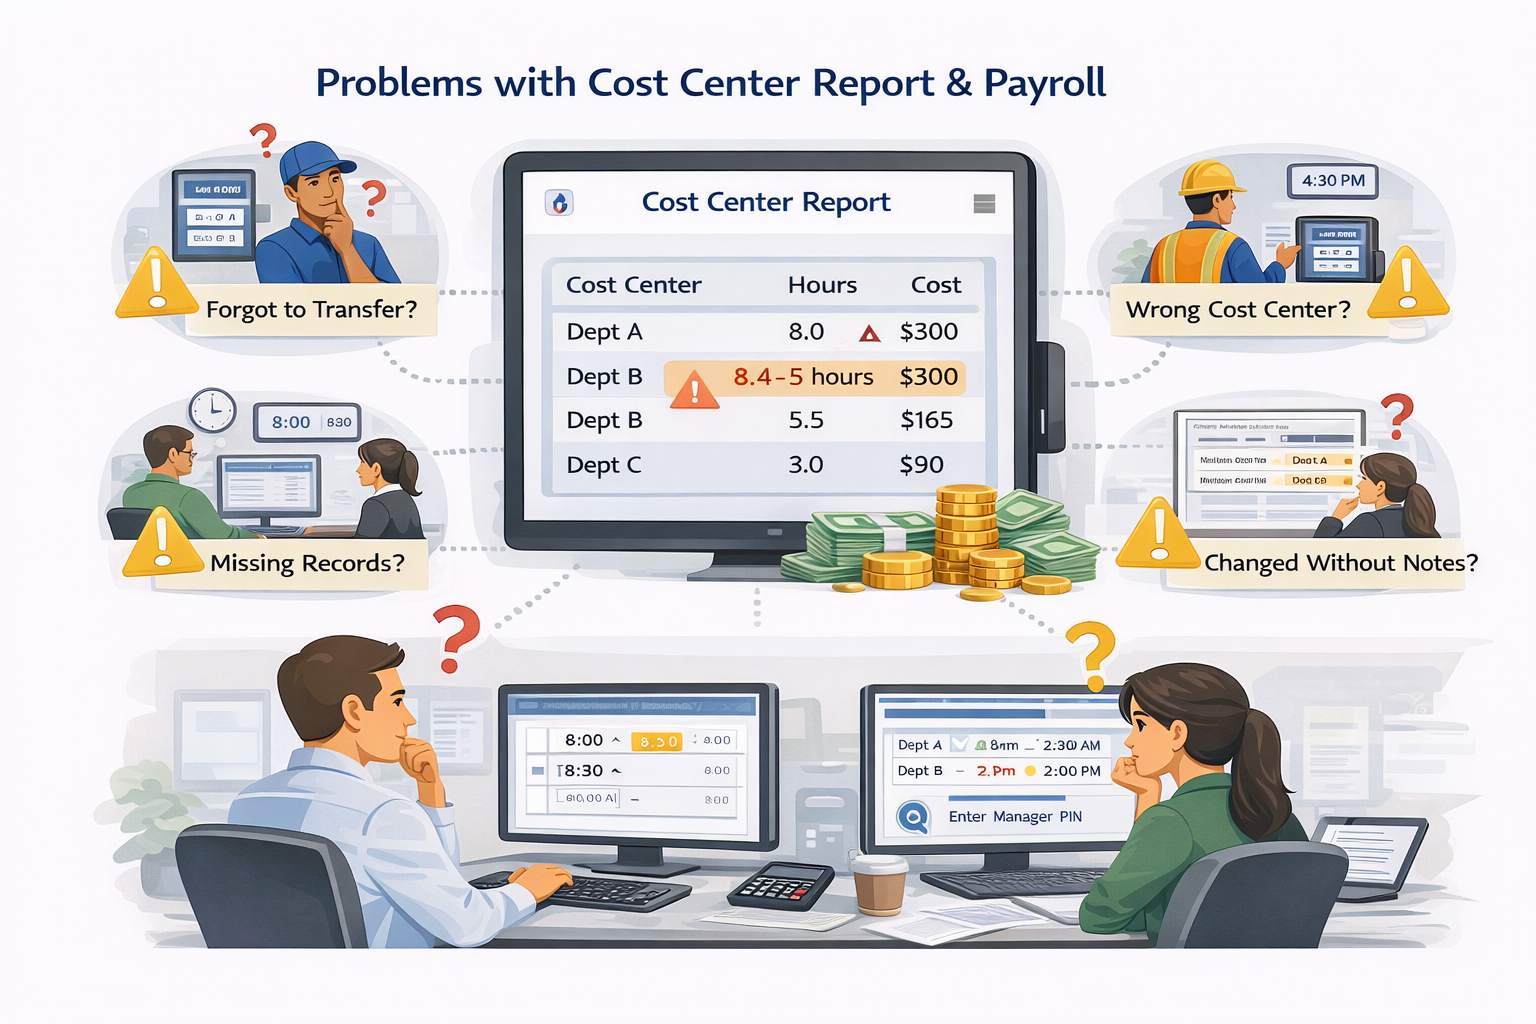
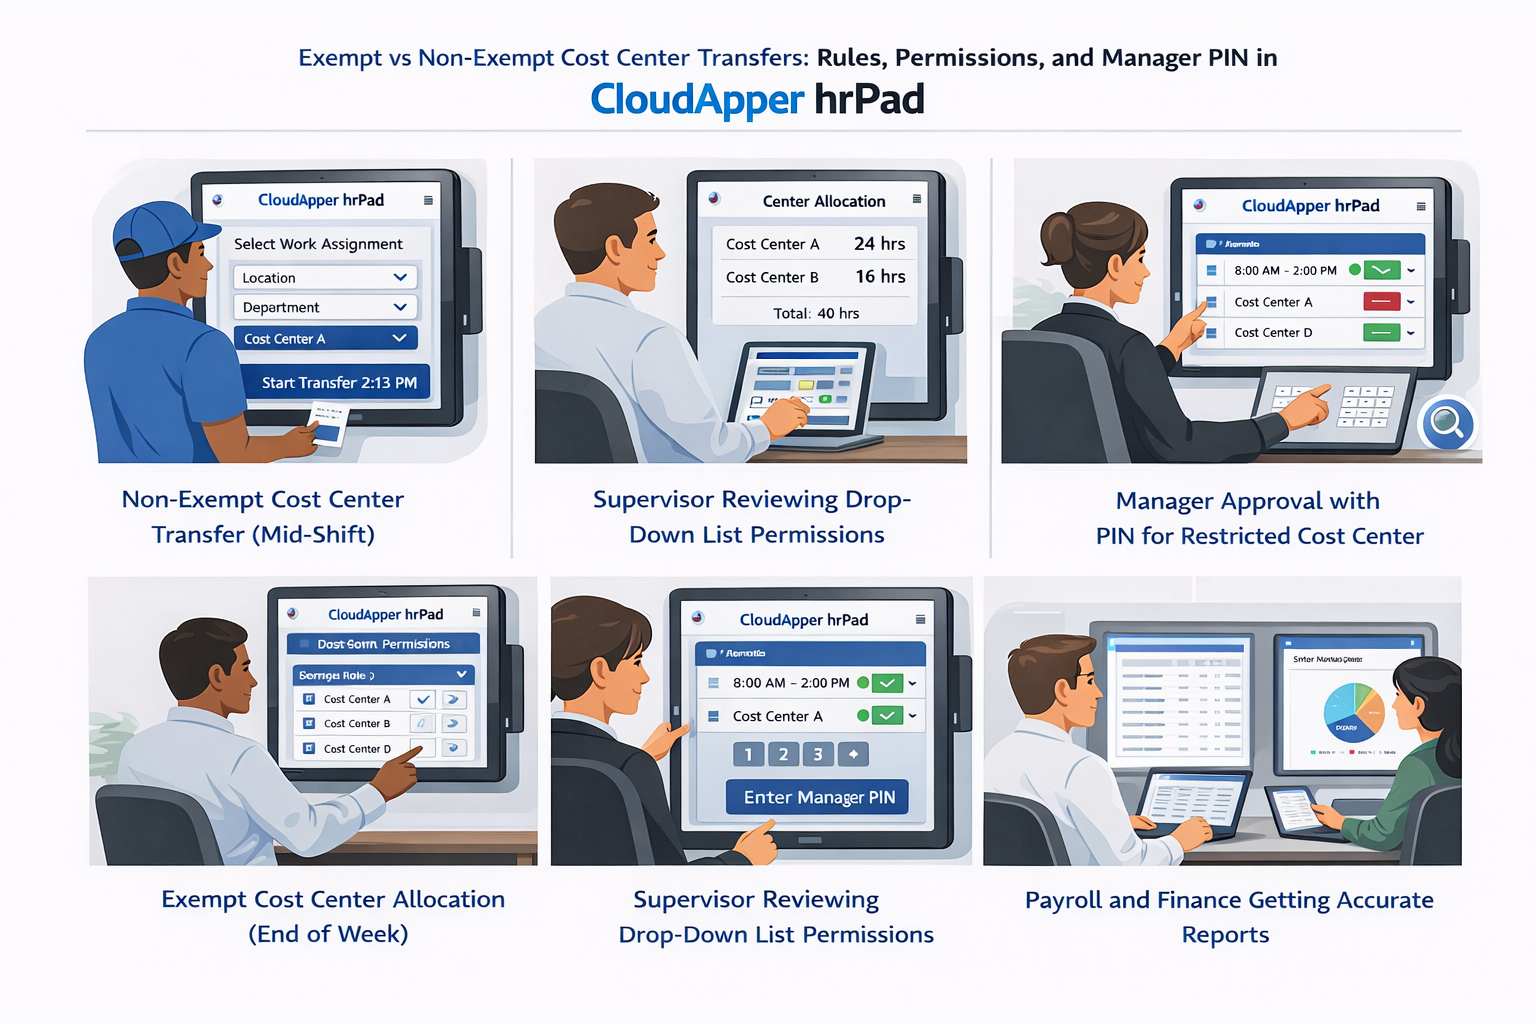
Non-exempt employees need transfers that reflect reality minute-by-minute. If someone worked Cost Center A until 2:13 PM and then moved to Cost Center B, you want the system to split that cleanly. Otherwise, you end up with overtime calculations and labor costing that don’t match what actually happened.
This is why many teams prefer an on-prem kiosk approach for hourly transfers. It’s immediate and it’s right where the work happens. The employee can walk up, tap “Transfer Cost Center,” select the new one, and move on.

Here’s a clean illustrated walkthrough of the most common on-premise flow for hourly transfers, including clock-in selection, mid-shift transfer, and automatic split hours.
What changes for salaried employees (exempt)
Exempt employees typically don’t live in the punch-by-punch world. Their “transfer” is often a weekly or pay-period allocation. That means the risk shifts. Instead of “wrong minutes,” you get “wrong distribution,” where someone allocates a whole week to the wrong place because it was faster, or because the list was confusing, or because nobody enforced rules.
This is another reason Exempt vs Non-Exempt Cost Center Transfers shouldn’t be treated like one generic feature. If you force salaried people into a punch-style transfer experience, it feels unnatural and they’ll resist it. If you give hourly employees a loose allocation experience, costing gets sloppy fast.
A payroll leader I’ve worked with summed it up in plain terms. “When hourly transfers aren’t captured at the moment, we end up doing forensic payroll later, and that’s when mistakes sneak in,” said Nabila S., Payroll Operations Manager. “A simple on-site transfer step saves hours of cleanup every single cycle.”

Where hrPad helps: it’s not just the button, it’s the guardrails
Most systems can technically let you “transfer.” The real question is whether you can transfer in a way that prevents mischarges without slowing people down.
CloudApper hrPad usually solves this with three layers that work together: rules, permissions, and Manager PIN.
And yes, this applies directly to Exempt vs Non-Exempt Cost Center Transfers, because each layer can be tuned differently depending on whether the employee is hourly or salaried.
Rules that keep transfers clean without feeling strict
Rules are how you make the kiosk feel like it’s helping, not policing.
For example, if someone is in a specific location, you can default them into the cost centers that match that site. If someone is scheduled for a certain department, you can keep the transfer list aligned with that reality. If your operation doesn’t want retro transfers without accountability, you can require a correction reason and push it through manager review.
When rules are set up well, employees don’t feel like they’re “doing extra steps.” They feel like the kiosk already understands what they’re trying to do.
Here’s an illustrated version of the flow when the hrPad UI is blended into the story. Notice how the screens stay simple and focused on what the employee needs in the moment.
Permissions that stop the “giant dropdown list” problem
If an employee can see every possible cost center, they will eventually pick the wrong one. Sometimes it’s an honest mistake. Sometimes it’s because two cost centers look almost identical. Either way, the outcome is the same. Your costing is off, and you lose time fixing it.
Permissions prevent that by shrinking the menu to what’s valid for that person. When done right, the employee’s list becomes short, familiar, and hard to mess up. And the manager’s approval view also stays clean because they’re not approving random cost centers that shouldn’t be in play.
A workforce systems analyst put it bluntly: “Most cost center mistakes come from choice overload and weak controls, not from bad intent,” said Imran K., WFM Systems Analyst. “When you lock the list down with role-based permissions, you remove the most common error source.”

Manager PIN for the moments you actually want control
This is the simplest, most practical control for real operations.
You don’t want a Manager PIN for every single transfer. That would annoy people and kill adoption. But you do want a Manager PIN for the exceptions that can create expensive mischarges.
This is where it fits naturally:
When an employee needs to transfer into a restricted cost center that only certain teams should charge to. Or when someone forgot to transfer mid-shift and is trying to fix it later, so you want a quick manager validation step before the correction becomes payroll reality.
In those moments, the Manager PIN acts like a “yes, this is real” checkpoint without turning the whole process into paperwork.
How this plays out differently for hourly vs salaried staff
Here’s the easiest way to think about it conversationally.
With hourly employees, the goal is accurate time splits. The controls help ensure they’re transferring at the right moment, into the right cost center, using a short valid list. The manager PIN is there for restricted transfers and after-the-fact fixes.

With salaried employees, the goal is clean allocations that match finance expectations. The controls help ensure their allocation options match what they’re allowed to charge to, and that the submission is consistent every week. Manager PIN or approvals can be used for unusual allocations, but most of the time you want the process to feel quick and routine.
That’s basically the heart of Exempt vs Non-Exempt Cost Center Transfers. Same problem on paper, totally different behavior in the real world.
Why this saves everyone time (and arguments)
When the transfer happens cleanly at the source, you stop the chain reaction.
Payroll stops chasing details. Finance stops questioning labor reports. Managers stop getting pulled into “who worked where” debates two weeks after the fact. Employees stop getting asked to remember what they did last Tuesday at 2 PM.
And because hrPad is on-prem and right where the work is happening, the experience stays grounded in reality. People don’t have to “remember later.” They can capture it when it happens.
Quick wrap-up
If you’re dealing with recurring mischarges, the answer usually isn’t “train harder.” It’s making the process hard to mess up. That’s why Exempt vs Non-Exempt Cost Center Transfers matters so much. Hourly transfers need accurate timing and clean splits. Salaried transfers need clear allocations that don’t rely on memory. Then rules, permissions, and Manager PIN do the quiet work of keeping everything clean without slowing people down.
What is CloudApper AI Platform?
CloudApper AI is an advanced platform that enables organizations to integrate AI into their existing enterprise systems effortlessly, without the need for technical expertise, costly development, or upgrading the underlying infrastructure. By transforming legacy systems into AI-capable solutions, CloudApper allows companies to harness the power of Generative AI quickly and efficiently. This approach has been successfully implemented with leading systems like UKG, Workday, Oracle, Paradox, Amazon AWS Bedrock and can be applied across various industries, helping businesses enhance productivity, automate processes, and gain deeper insights without the usual complexities. With CloudApper AI, you can start experiencing the transformative benefits of AI today. Learn More
- Useful Links:
- Agentic AI
- No-Code/Low-Code
- Custom Software
- WorkBridge
- iPaaS
- FedRAMP

Brochure
CloudApper hrPad
Empower Frontline Employees with an AI-Powered Tablet/iPad Solution
Download Brochure
CloudApper AI Solutions for HR


- Works with


- and more.


Similar Posts
How to Configure Workday Vacation Accruals Based on Earnings and…

Pay Transparency Compliance at the Frontline: A Mid-Market HR Playbook